CSI Logo
  • Contact Us
  • Login
  • Search
  • CART
  • About Us
    • General Overview
    • Operations Overview
    • Management Overview
    • Core Technology
    • Awards
    • Our Customers
  • Products
    • LED Lighting Control
      • Controllers
        • ILC-100m Monochrome Controller
        • ILC-200bw Bi-White Controller
        • ILC-300 RGB/3 ch. TW Controller
        • ILC-400 RGBW/4 ch. Mono Controller
        • ILC-450 RGBW Constant Current Controller
        • ILC-460/461 RGBW DMX Controller
        • ILC-640d DALI II Encoderr
      • FLLA Linear LED Strips
        • RGBW-Full Color/Tunable White Catalog
        • RGB Catalog
        • Tunable White Only Catalog
        • Monochrome Catalog
      • Gateways/Comm. Devices
        • e-Node 2000 (IP)
        • e-Node 2100/dmx (IP)
        • e-Node 4000 (IP)
        • e-Node 4100/dmx (IP)
        • IBT-100 (RS-232c)
      • Keypads
        • BSKP-2110L (11-button)
        • BSKP-2020 (Decora rocker-type)
      • Interconnect Accesories
        • RGB Leader Cables
        • RGBW Leader Cables
        • Monochrome Leader Cables
        • Corner Cables
        • CS-Bus Splitter
      • Power Supplies
        • 24vDC 96 watt
        • 24vDC 120 watt
        • 24vDC 96 watt/DIN Rail
        • 48vDC 96 watt/DIN Rail
        • e-Node Power Supply
      • Software
        • e-Node Pilot Commissioning Software
        • Virtual Keypad
        • Firmware Updates
        • Driver/Modules (3rd party integration)
    • Motor Control
      • Controllers
        • IMC-100 (120v) Single Motor Controller
        • IMC-101 (240v) Single Motor Controllerr
        • IMC-300 (120v) Triple Motor Controller
        • IMC-300 (240v) Triple Motor Controller
        • STI-100 (120v) Screen Trigger Interface
        • IRC-100 Intelligent Relay Controllers
        • s
      • Gateway/Comm. Devices
        • e-Node (IP)
        • IBT-100 (RS-232c)
      • Keypads
        • BSKP-2110L (11-button w/ presets)
        • BSKP-2030 (3-button)
        • BSKP-2050 (5-button)
      • Interconnect Accesories
        • Corner Cables
        • CS-Bus splitters
      • Software
        • e-Node Pilot Commissioning Software
        • Virtual Keypad
        • Firmware Updates
        • Driver/Modules (3rd party integration)
    • Building Monitoring
    • Interactive Kiosks
    • Custom/OEM Engineering
    • Daylight Harvesting
  • Resources
    • Dealer Portal (login)
    • Automation Partner Drivers
      • AMX
      • Crestron
      • Control4
      • ELAN (Nice)
      • Key Digital
      • Leviton/Bitwise
      • Lutron
      • On Controls
      • Savant
      • RTI
      • URC
      • Vantage
      • Device Driver Toolkit
    • Literature/Catalogs
      • LED Lighting
      • Motor Control
    • Installation Guides/Tech Notes
      • LED Lighting
      • Motor Control
      • Integration Solutions/Integration Notes
    • FAQ/Troubleshooting/Tech Support
    • Software Downloads (login)
    • Device Driver Toolkit
    • Videos
      • Programming Videos
      • Showcase Videos
    • Demos
      • Smart Phone UI
      • Color Picker
    • Pressroom
      • Press/News
  • Gallery
    • LED Showcase
  • Where To Buy
    • United States
    • Canada
    • Mexico
    • Central America
    • South America
    • Europe
    • Rest of World
    • OEM Parters
      • DreamScape Lighting
      • Light & Green
      • Others--contact us

Search Converging Systems

  1. FAQ Lighting

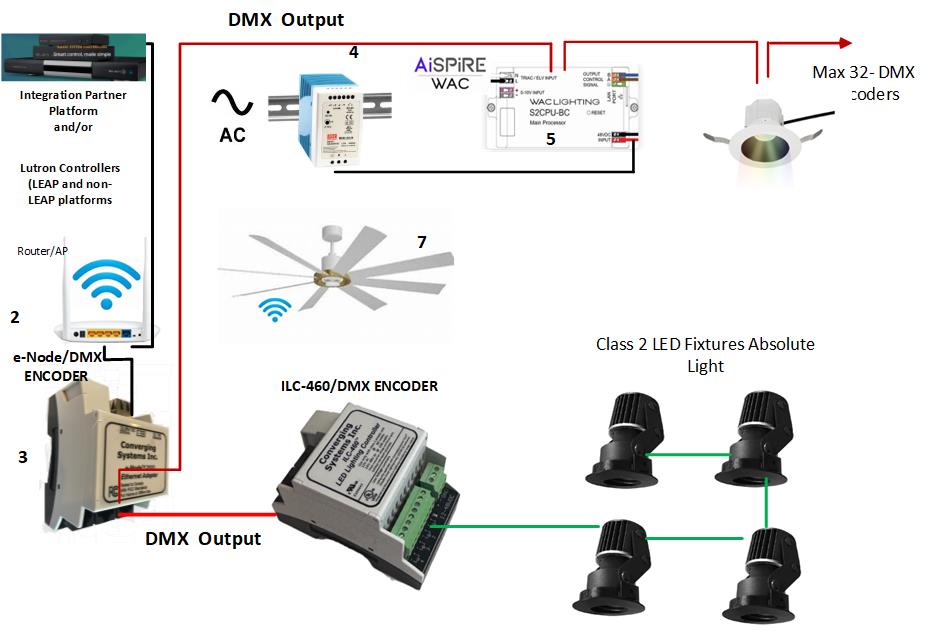
Set-up and Testing of the e-Node dmx 2100/4100 models.
xxxx

Review the applicable document for respective e-Node model.

  1. Quick Start Guide for e-Node/dmx 2100/4100


Important Steps that must be followed before the e-Node dmx 2100/4100 can be used to control connected (or to be connected) DMX devices.

  1. Make sure you have selected the applicable e-Node/xxxx for your system requirements.

    You will need one e-Node dmx 2100/4100 gateway for each 32-DMX fixtures.

  2. Install the e-Node into an appropriate housing and network connect the e-Node to your Local Area Network Switch (not your PC's Ethernet port).

    Mount the e-Node(s) in the equipment rack or in a remote location (i.e., closer to the ILC-xx0 controllers or the DMX fixtures that the device will be controlling. Since the e-Node family of gateways are packaged in a DIN-Rail form factor, it makes it quite easy to simply mount the e-Node devices in a DIN-RAIL box. Power up your unit with either POE (e-Node 4100) or a wall wart for e-Node 4x00 (if you don't have POE) or e-Node 2100. If the e-Node/2100/4100is mounted in the equipment rack, a LAN cable must be run from (each) e-Node/xxxx to any active network switch. Do not in general connect the Gateway to a free Ethernet port on your laptop or desktop. Occasionally, we have seen cases where dealers attempt to connect the e-Node/2100/4100 to their computer's Ethernet port and set up the e-Node with a static IP address to communicate with the laptop in AUTO-IP mode. AUTO-IP Mode will not allow the e-Node to communicate with 3rd-party control systems so in general do not setup the e-Node this way.

  3. Select appropriate IP Addressing (Dynamic/ Dynamic with Reservations or Static IP Addressing).

    By default, the e-Node comes factory configured for Dynamic (DHCP ENABLED) addressing. It is recommended that the installer either (i) set the e-Node for DHCP DISABLE (i.e., STATIC addressing) using its web page/setup tool, or (ii) or leave the e-Node with its factory default of DHCP ENABLED and use your network Router setup features to reserve a "Static IP address" for the e-Node.

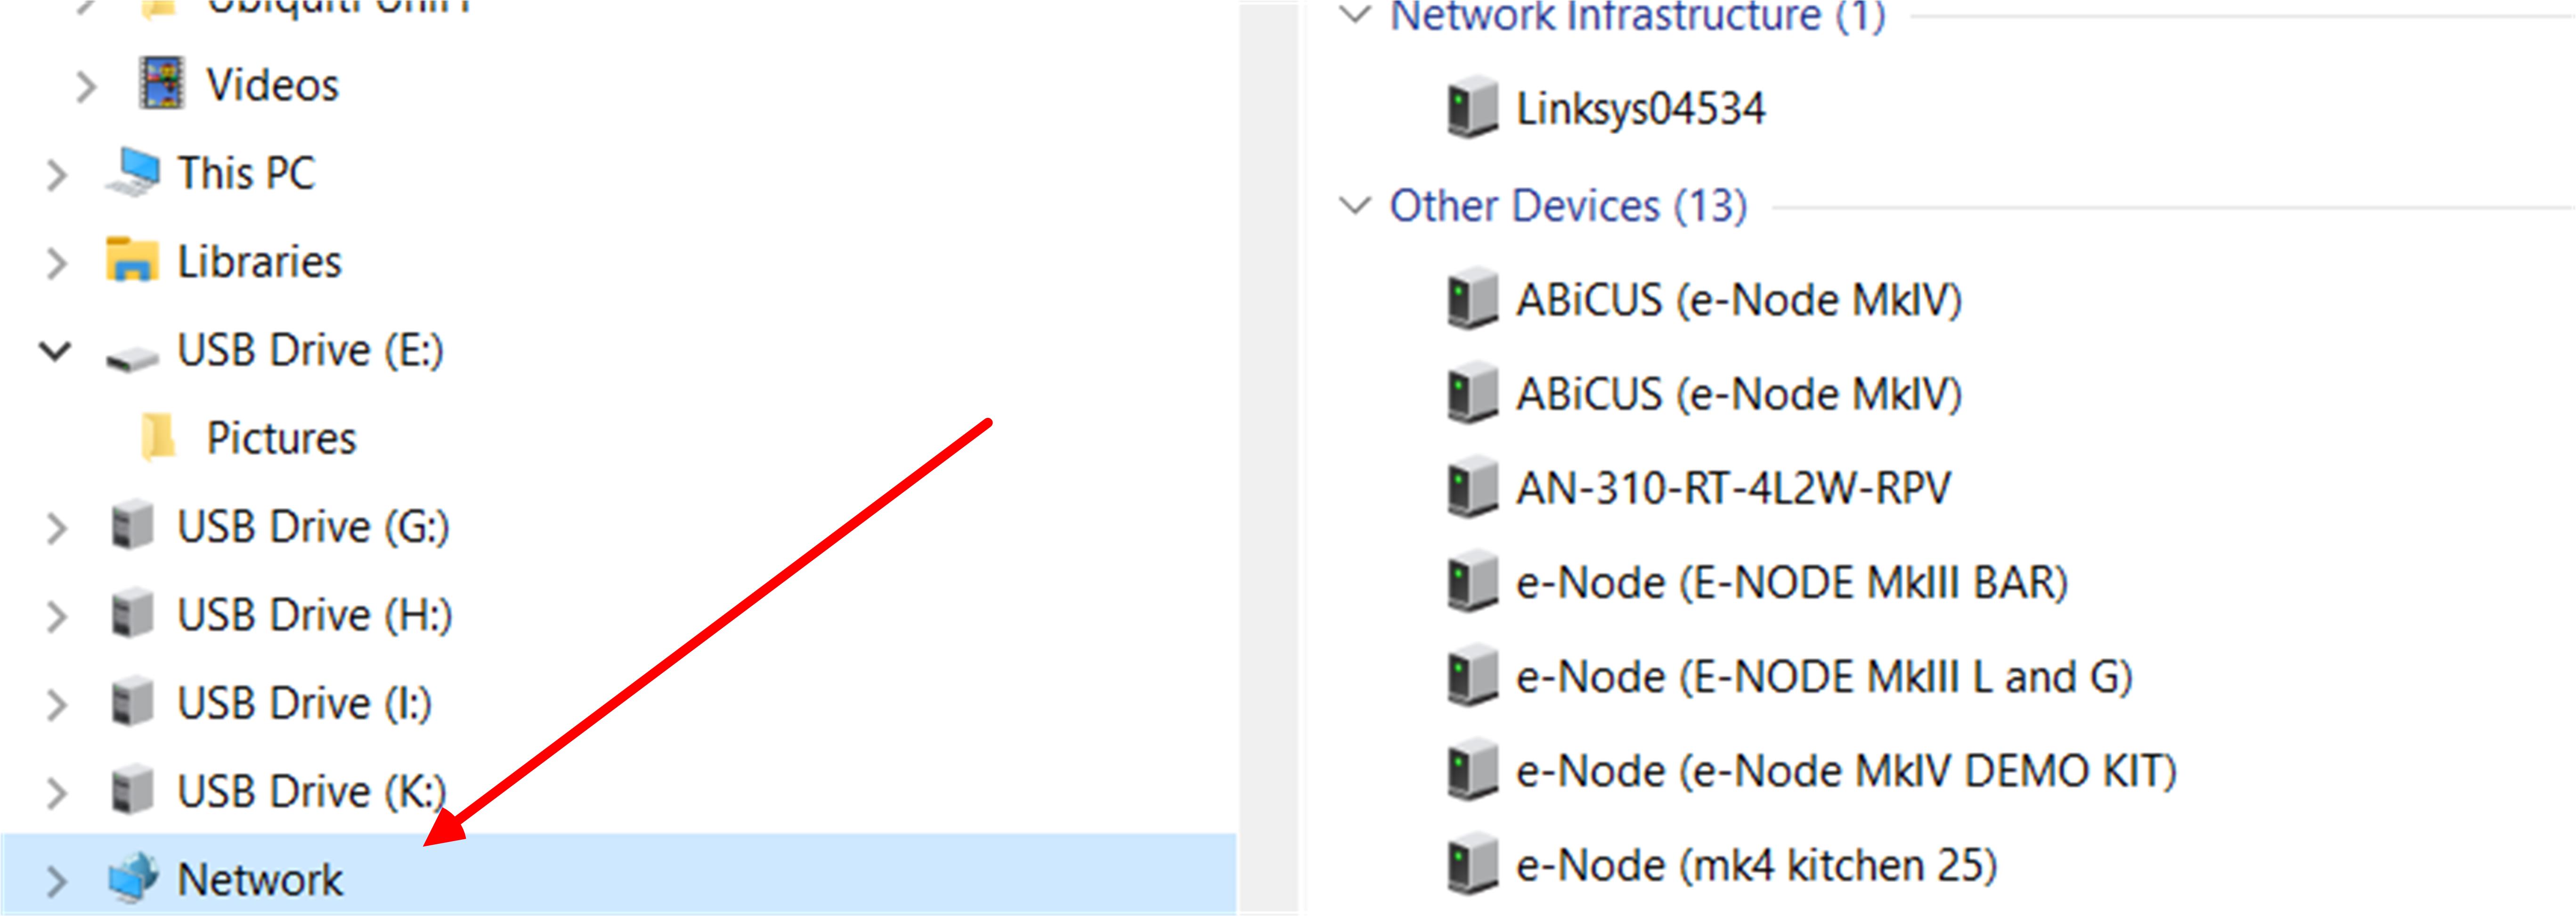
  4. Reboot e-Node after making any DHCP changes and use Windows File Explorer to discover the e-Node.
    xxxx
  5. After discovering e-Node on your network, double-click on the entry to launch its built-in web-page.

    xxxx
  6. Select the triple bar (settings icon), and navigate to e-Node/Properties/Settings Page and search for MODE entry (see image below) and make sure it is set to the appropriate MODE (DMX) and select that name on the Ribbon (end of red arrow) and discover/add devices as appropriate for your system using the e-Node's web-page.

    Note: Your unit may have other MODES available so make sure you have selected DMX. If it was setup that way, you are all set. But if was set to alternative mode (PURE or DALI) you must reboot after you selected DMX Mode.

    xxxx

    For DMX Mode devices, add DMX devices using the DMX tab.

  • e-Node Quick Reference Guide.
  • e-Node Quick Reference Guide.
  • White Paper RDM
  • DMX Primer on Addressing.
  • How to Perform Soft and Hard Resets on e-Node .
  • Multi-channel DMX Setup.

  • Home
  • About
  • Where to Buy
  • Contact
  • Trade | Contract | Press
  • Integration Resources
  • Press
  • Catalog
  • Subscribe to Newsletter

  • © Copyright Converging Systems Inc.
    • Privacy Policy
    • Warranty